Quick Start Guide
Welcome to ALwrity!
This guide will help you set up ALwrity on your local machine for development. Whether you are a first-time contributor, a developer exploring the project, or someone who wants to run ALwrity locally, this guide provides a step-by-step setup process.
By the end of this guide, you will be able to:
- Clone the ALwrity repository.
- Install the required backend and frontend dependencies (software packages).
- Configure the required environment variables.
- Run ALwrity successfully on your local machine.
- Verify that the application is working correctly.
Prerequisites
Before setting up ALwrity, ensure the following requirements are met:
- Python 3.10 or later – Required to run the backend services.
- Node.js 18 or later – Required to build and run the frontend application.
- Git – Required to clone the ALwrity repository.
- AI Service API Keys – Required to enable AI-powered content generation features.
Verify that Python, Node.js, and Git are installed by running:
If each command displays a version number, your system is ready for installation.
If any of these commands are not recognized, install the required software before continuing.
Installation
Follow the steps below to install ALwrity on your local machine.
1. Clone the Repository
Open a terminal (Command Prompt, PowerShell, or Terminal) and run:
After cloning the repository, your project directory should look similar to the following: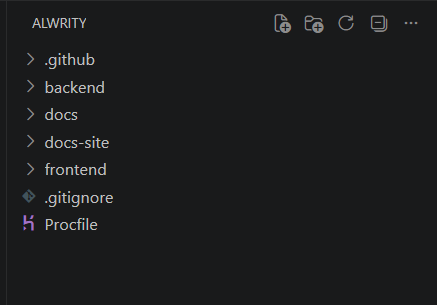
The repository is organized into the following main directories:
- backend/ – Python backend services
- frontend/ – React frontend application
- docs-site/ – Documentation website built with MkDocs
- docs/ – Internal project documentation
- .github/ – GitHub workflows and project templates
If Git is not installed, download and install it from Git Downloads before continuing.
2. Install Backend Dependencies
Move to the backend directory:
Install the required Python packages:
Wait until the installation completes successfully before proceeding to the next step. If any errors occur, resolve them before continuing.
3. Install Frontend Dependencies
Return to the project root:
Move to the frontend directory:
Install the required Node.js packages:
This may take a few minutes depending on your internet connection.
After the installation completes successfully, continue to the configuration step.
Configuration
Before running ALwrity, you need to configure the required environment variables for both the backend and frontend.
1. Backend Environment Variables
Navigate to the backend directory.
The backend provides an env_template.txt file that contains the required environment variables.
Copy this template and rename it to .env.
Windows (Command Prompt)
Linux/macOS
After creating the .env file, open it in your preferred text editor and replace the placeholder values with your own configuration.
The .env file stores configuration values such as API keys, server settings, and database configuration that the backend requires to run.
Example:
GEMINI_API_KEY=your_gemini_api_key
OPENAI_API_KEY=your_openai_api_key
ANTHROPIC_API_KEY=your_anthropic_api_key
The following table explains the most important environment variables used during local development.
Environment Variable Descriptions
| Variable | Description | Where to Get It |
|---|---|---|
GEMINI_API_KEY |
API key used to access Google's Gemini models for AI-powered content generation. | Google AI Studio |
OPENAI_API_KEY |
API key used to access OpenAI models such as GPT. | OpenAI Platform |
ANTHROPIC_API_KEY |
API key used to access Anthropic Claude models. | Anthropic Console |
DATABASE_URL |
Database connection string used by the backend. Leave the default value for local development. | No action required |
SECRET_KEY |
Secret key used by the backend for secure sessions and authentication. Generate a random secure string before deployment. | Generate your own |
HOST |
Network interface on which the backend server runs. | Keep the default value (0.0.0.0) |
PORT |
Port used by the backend server. | Keep the default value (8000) |
DEBUG |
Enables debugging features during development. | Use true for development |
LOG_LEVEL |
Controls the amount of log information displayed by the backend. | Keep the default value (INFO) |
Important: Replace the placeholder API keys and
SECRET_KEYwith your own values before starting the backend.
2. Frontend Environment Variables
The frontend includes an env_template.txt file containing the required environment variables.
Copy this template and rename it to .env.
Windows (Command Prompt)
Linux/macOS
After creating the .env file, open it in your preferred text editor and update the required values.
Example:
REACT_APP_API_BASE_URL=http://localhost:8000
REACT_APP_CLERK_PUBLISHABLE_KEY=your_clerk_publishable_key
REACT_APP_CLERK_JWT_TEMPLATE=
Frontend Environment Variable Descriptions
| Variable | Description | Where to Get It |
|---|---|---|
REACT_APP_API_BASE_URL |
URL of the backend server that the frontend communicates with. | Use http://localhost:8000 for local development. |
REACT_APP_CLERK_PUBLISHABLE_KEY |
Public key used by Clerk for frontend authentication. | Clerk Dashboard |
REACT_APP_CLERK_JWT_TEMPLATE |
Optional JWT template name used for authentication if configured in Clerk. Leave it blank unless your Clerk setup requires it. | Clerk Dashboard (optional) |
Important: Replace
your_clerk_publishable_keywith your own Publishable Key before running the frontend.
You can create a free Clerk application and obtain your Publishable Key from the official Clerk documentation:
After saving the .env file, the frontend is ready to communicate with your local backend.
Running the Application
After completing the installation and configuration steps, you can start the backend and frontend servers.
1. Start the Backend
Open a terminal and navigate to the backend directory.
If the backend starts successfully, you should see startup logs in the terminal.
To verify that the backend is running correctly, open the following URL in your web browser:
2. Start the Frontend
Open another terminal and navigate to the frontend directory.
Once the frontend starts successfully, open the following URL in your web browser:
If the setup was completed successfully, the ALwrity dashboard should load in your browser.
Your First Content
1. Access the Dashboard
Once both the backend and frontend are running successfully, open your web browser and visit:
If this is your first time using ALwrity, complete the onboarding process by following the on-screen instructions.
After onboarding is complete, the ALwrity dashboard will open. From there, you can access ALwrity's AI-powered tools, including Blog Writer, LinkedIn Writer, SEO tools, and other content generation features.
2. Create Your First Blog Post
Follow these steps to generate your first AI-powered blog post:
- From the dashboard, open Blog Writer.
- Enter a blog topic or a keyword you want to write about.
- Configure any available options, such as language, tone, or content preferences (if required).
- Click Generate Content.
- Wait for ALwrity to generate the blog draft.
- Review the generated content and make any edits you want.
- Use the SEO Analysis tools to improve the content before publishing or exporting it.
Blog Writer Example
The screenshot below shows the Blog Writer interface.

Tip: If content generation fails, verify that your AI API keys are configured correctly in the backend
.envfile.
3. Create LinkedIn Content
ALwrity also helps you create professional LinkedIn content.
To get started:
- Open LinkedIn Writer from the dashboard.
- Choose the type of content you want to create (for example, a post, article, or carousel).
- Enter your topic and specify your target audience.
- Click Generate to create the initial content.
- Review the generated content and make any edits before publishing.
LinkedIn Writer Example
The screenshot below shows the LinkedIn Writer interface.

Tip: You can regenerate the content or modify the prompt if you want different writing styles or results.
Next Steps
- Configuration Guide - Advanced configuration options
- First Steps - Detailed walkthrough of key features
- API Reference - Integrate with your applications
- Best Practices - Optimize your content strategy
Troubleshooting
If you encounter any issues:
- Check the Troubleshooting Guide
- Verify that your API keys have been added correctly to the backend
.envfile. - Ensure all dependencies are installed.
- Check the console for error messages.
Need Help?
If you encounter a bug, have a question, or would like to request a feature:
- Visit the GitHub Issues page to report bugs, ask questions, or request features.
Ready to start creating AI-powered content? Check out our First Steps Guide for a detailed walkthrough!